Like MM, you can launch the SPMT from the SharePoint admin center, as shown in the following screenshot:
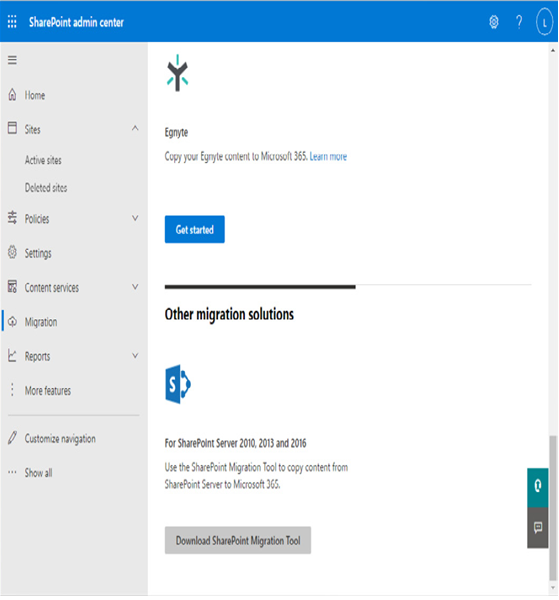
Figure 12.22 – SPMT
You’ll be prompted to save the download and then can launch it.
The SPMT can be used to migrate SharePoint server sites, workflows, and libraries along with Windows file shares. The process is very similar for each—simply specifying a top-level folder or site to include as part of a migration.
To use SharePoint MM, follow these steps:
- Navigate to the SharePoint admin center.
- Expand Migration and then select Download SharePoint Migration Tool under Other migration solutions.
- Launch the downloaded application.
- When prompted, enter credentials for an account with SharePoint Administrator or Global Administrator credentials.
- In the SPMT window, click Start a new migration.
- On the Copy content from page, select the content source, as shown in the following screenshot:
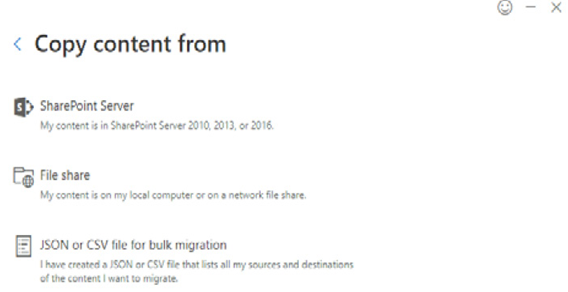
Figure 12.23 – The Copy content from page
- Once you have selected the type of content, select the appropriate options. If you select SharePoint Server, you’ll be prompted to choose from Site migration, List or document library migration, and Workflow migration options, along with the URL for the site, list, library, or workflow. If you choose File share, you’ll be prompted to enter a local or network drive path. If you choose JSON or CSV file for bulk migration, you’ll be prompted to input the path to a JSON or CSV file:
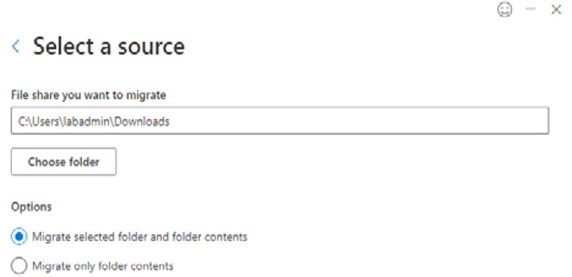
Figure 12.24 – Selecting a source for file share migration
- Click Next.
- On the Copy content to page, select a destination:
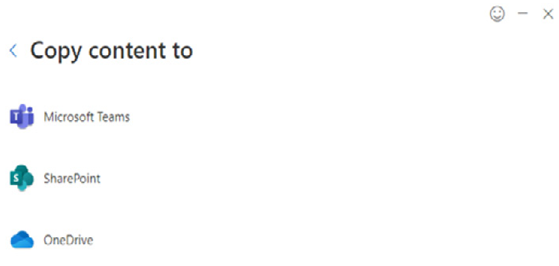
Figure 12.25 – The Copy content to page
- On the Select a destination page, enter the destination. If the target site or team does not exist, the SPMT will create it for you. Click Next.
- On the Review migration page, enter a name for the migration and review the settings. You can click Add another migration and choose additional sources – whether they are a file share, SharePoint Server, or workflow sources. When finished, click Next:
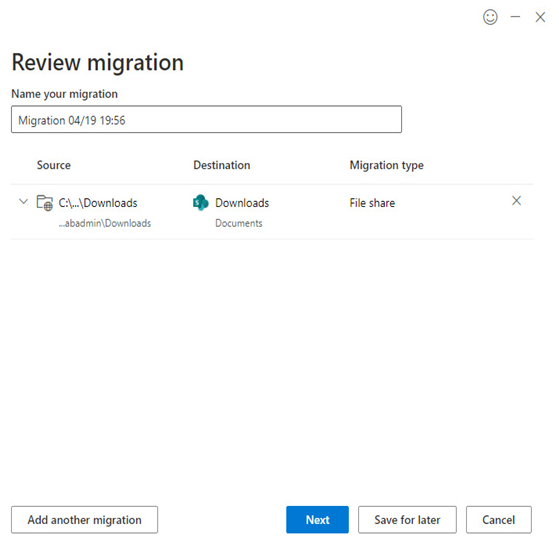
Figure 12.26 – The Review migration page
- On the Choose your settings page, select which options you want the SPMT to perform. The View all settings button exposes additional settings, such as being able to specify a particular user mapping file, date ranges for migrating files, hidden files, options to replace invalid characters in filenames, an automatic rerun of the application, and a custom Azure storage location:
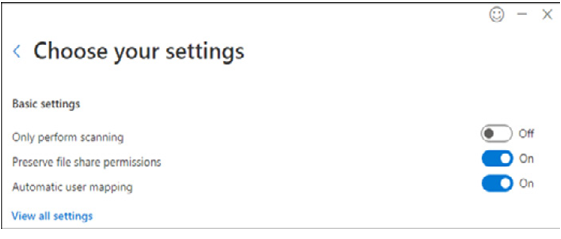
Figure 12.27 – Choosing the migration settings
- Click Migrate to begin the migration process.
Post-migration, it’s recommended to check the destination libraries, teams, sites, or workflows to ensure that they’ve been migrated successfully and update any configurations or permissions as necessary.
Next, we’ll dive into SharePoint hybrid features and requirements.
Identifying hybrid requirements for SharePoint Online
A SharePoint hybrid deployment does not perform the same functions as an Exchange hybrid deployment with regard to migrating data. With SharePoint hybrid, you establish a certain level of coexistence, integration, and redirection between on-premises SharePoint Server farms and SharePoint Online.


Leave a Reply